Sunday, April 10, 2022

Maltese Easter Cookies (Figolli)


Nicole here and back again with another one of my Maltese favourites! Easter Cookies or figolli (plural of figolla) is the most commonly consumed pastry during the religious celebration of Easter.  When my siblings and I were little we would each receive a figolla from my godparents after church on Palm Sunday. The cookies were absolutely stunning. They were  pieces of artwork, too lovely to taste. They came in various shapes and sizes from mermaids and chicks to dragonflies and rabbits. Each were lovingly decorated in various pastel colours. 

Biting into a figolla tastes like marzipan sandwiched between buttery cookies. It is then enveloped in a light, citrus icing. Hints of citrus are also carried into the cookie pastry and the almond-paste filling. Therefore, it is with great intention that I find myself finalizing the last step of my figolli cookie production on this Palm Sunday.

While the process of making figolli is laborious, it is manageable when the process is spread over a series of two-three days, consisting of pastry dough preparation, baking and cookie decoration. Cookie assembly is also easier when smaller cookie cutters are used! 

Lastly, and most importantly, this recipe is gluten-free so that folks may partake in the joys of this spring cookie!

Tea Pairing: Earl Grey (Bergamot Tea)

Yield: 30-32 cookies

What you Need:

Almond Filling

2 small egg whites
1 tsp. almond essence
1 cup ground natural almonds
2 cups icing sugar
1 tsp. fine lemon zest

Cookie Pastry

¾ cup refined sugar 
1 cup butter, softened
2 eggs
1/4 tsp. vanilla essence
2 cups Millet flour*
1 tsp. baking powder
1 tsp. fine lemon zest

 *(If a gluten free recipe is not desired, replace the millet flour with pastry flour)

Icing

1 cup icing sugar
4 tsp. plant-based milk*
1 tsp. corn syrup
1/4 tsp. almond essence
1/2 tsp. fine lemon zest
Drops of food colour (optional)

*(I used cashew milk for this batch but almond milk would work exceptionally well)

Tools 

Distilled water
Piping bag & frosting tip
Parchment paper/aluminum foil
Plastic cling-wrap
Rolling pin
Spring cookie cutters

Tip: You will need the zest of one full lemon to complete the cookie pastry, filling & icing for this recipe.

How to Make it Happen:

Almond Filling

  1. Whisk the egg whites together with almond essence and set aside. 
  2. In a separate bowl, combine the ground almonds, icing sugar and lemon zest together, slowly adding the almond mixture to the egg-whites until all is combined. The mixture will be gummy. PLEASE NOTE: if you use large egg whites in this recipe your mixture will be gooey. To solidify your almond paste filling, add more icing sugar. 
  3. Wrap the almond paste filling in plastic cling-wrap and chill for up to 3 hours or overnight.
    The almond paste filling will be gummy (but not gooey)

Cookie Pastry 

  1. Whisk two eggs together and add the vanilla essence. In a separate bowl, cream together the butter and sugar, adding the whisked eggs and flavoring until the ingredients are well incorporated. 
  2. In another separate bowl sift the millet flour, adding it to the wet mixture along with baking powder and lemon zest. Mix together until the pastry dough begins to form. 
  3. Wrap the cookie pastry in plastic cling-wrap and chill for up to 3 hours or overnight. 
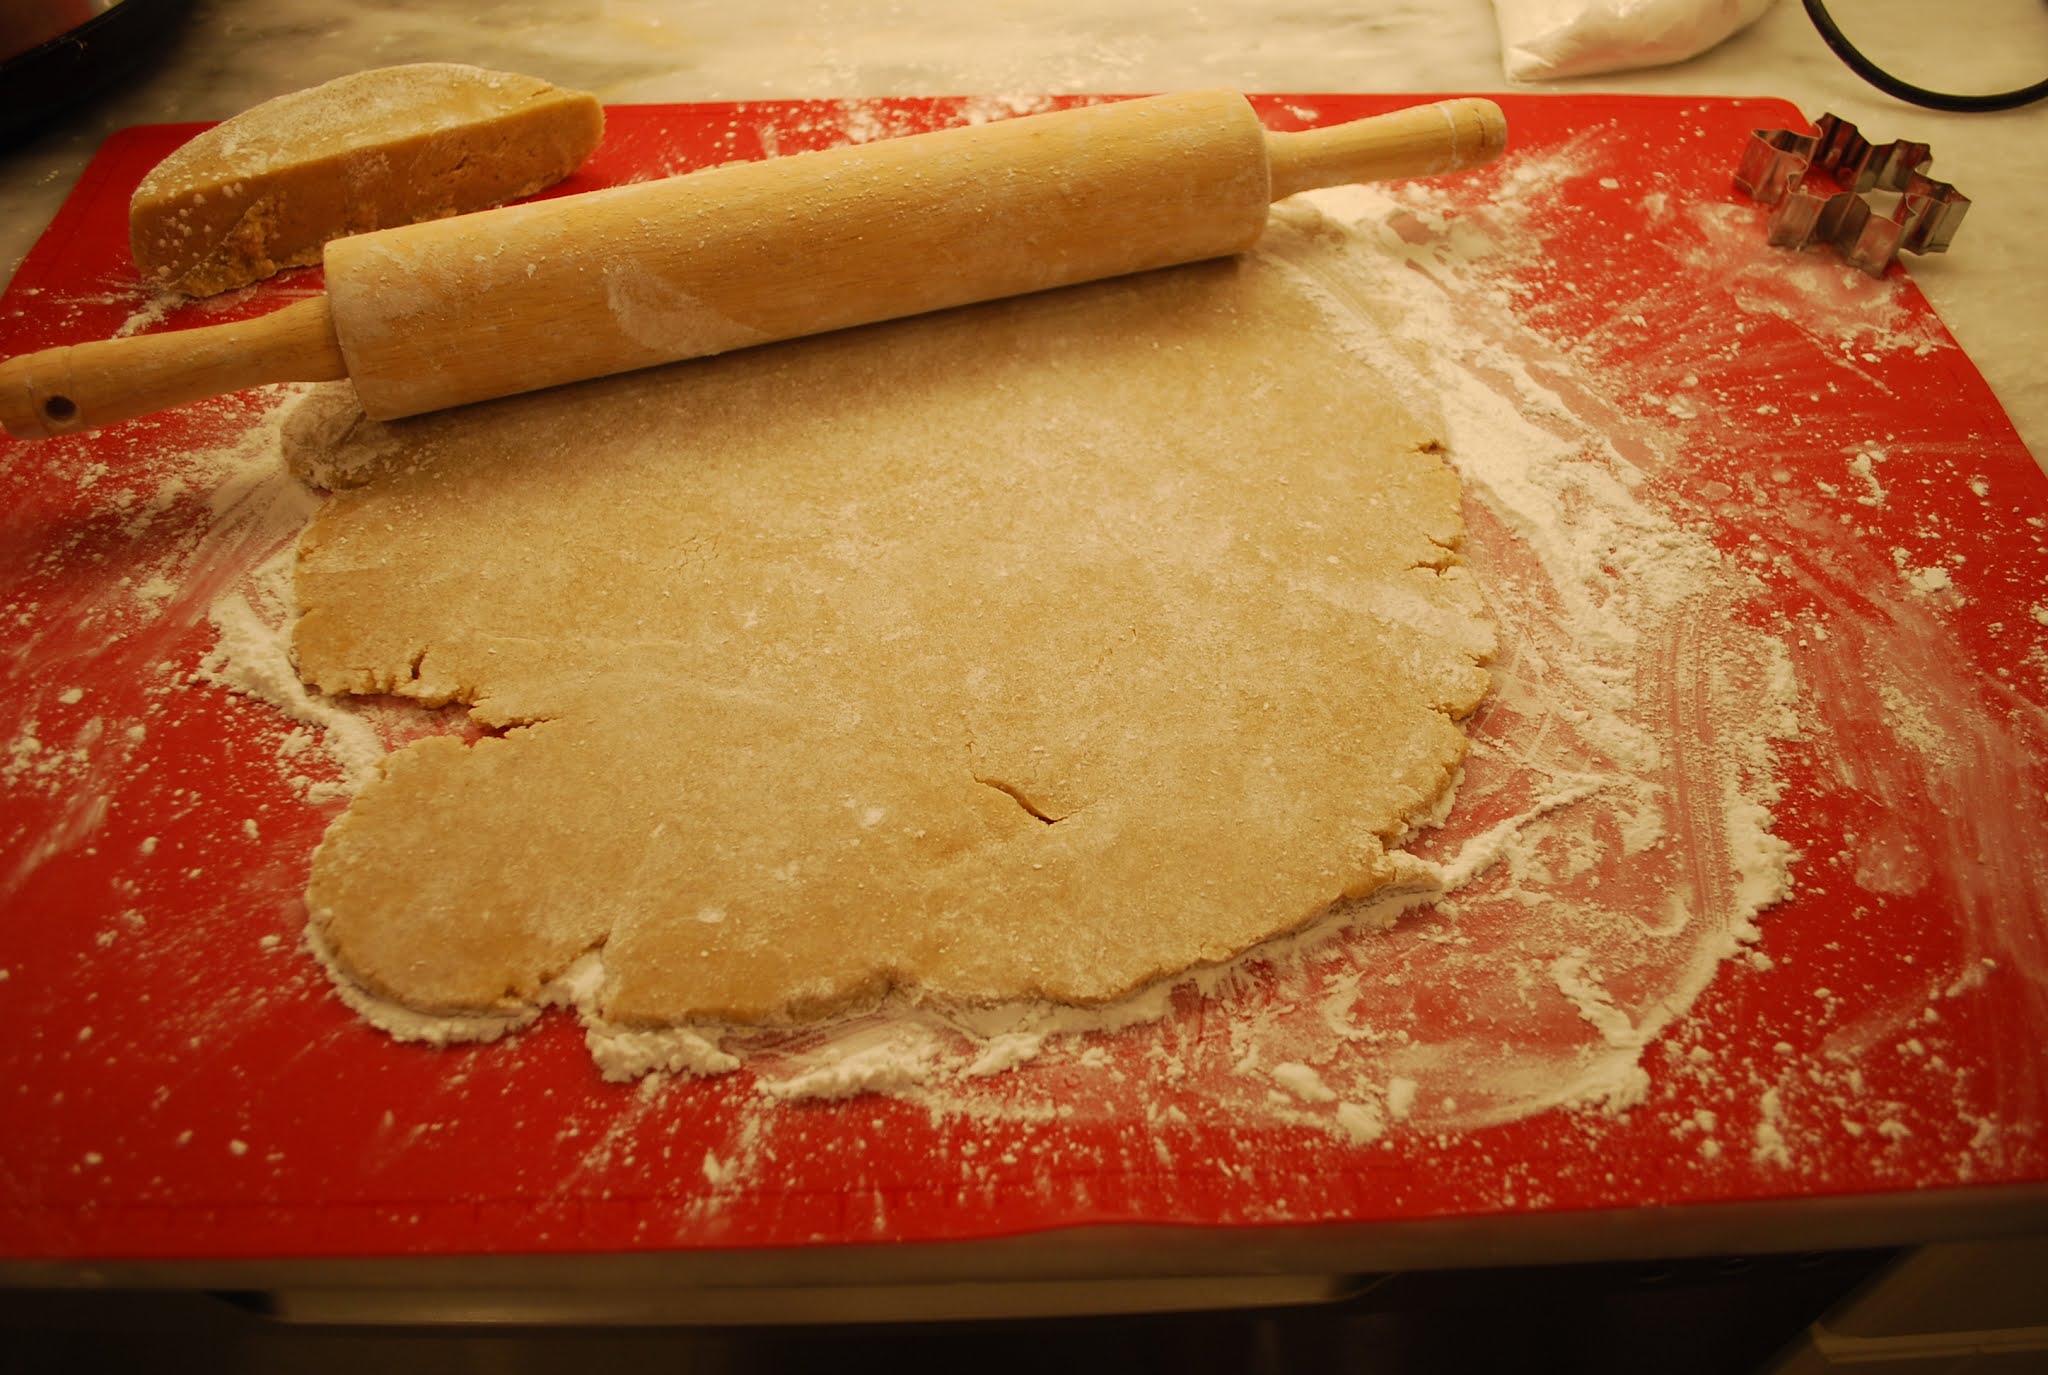
  4. Once chilled, roll out the pastry into a 1/4-inch thickness to ready cookie production. Ensure that millet flour is used liberally on your working surface to prevent the dough from sticking. QUICK TIP: Gluten free flours thrive best when they are kneaded as little as possible. Do your best to limit rolling and re-rolling your dough. If the dough becomes too difficult to work with, chill the dough and start again. 
    Roll pastry to 1/4-inch thickness to ready cookie production

  5. You will need two cookies of the same shape and size to complete one entire cookie as they will be sandwiched together with the almond paste filling.  Prepare each cookie top and bottom beside each other on a lightly greased cookie tray and set aside. 
  6. Once the almond filling has slightly thawed, roll it out in similar fashion to the pastry dough. QUICK TIP: To work easily with the almond paste filling, roll the filling between two sheets of plastic cling-wrap. Typically 1/4-1/2 inch thickness works well with these cookies, keeping in mind that the filling will be sandwiched between two cookies. 
    Use plastic cling-wrap to help ease the almond-paste filling process

  7. Use the same cookie cutter to complete the cookie's almond-paste filling. 
  8. Place each almond-paste filling onto one of two sides of the pastry cookies, placing one for every second cookie on your baking sheet. 
    Place the almond filling on every second cookie

  9. Place the second cookie on each of their matching tops to complete your cookie sandwiches. Pour a small dish of distilled water and use your fingertips to dampen the cookie's edges to seal the figolli, ensuring the delicious filling does not escape! 
    Wow, look at that filling! This is my happy place


  10. Bake the cookies for 15-20 minutes in a 350 degree oven. Once the cookies have cooled, they can be stored in an air tight container or prepped for decorating. 

Icing Preparation

  1. In a medium bowl, combine the sifted icing sugar and plant-based milk together, mixing until the icing sugar has dissolved. Ensure the lemon zest is finely chopped for consistency before incorporating into the icing mixture. 
  2. Add the almond extract and corn syrup to the icing mixture. PLEASE NOTE: While you can skip adding corn syrup to the recipe, I find it helps create a glossy finish for the figolli. 
  3. If desired, add food colouring and mix until all ingredients are thoroughly integrated. 
  4. Once the cookies have cooled, use a piping bag to create an icing boarder around each cookie and allow to set before filling in each cookie's centre. 
    Create an icing boarder around each cookie and allow to set

  5. Fill in the remaining centres with icing and allow to set before packaging & storing.  

    Fill the remaining cookie centres
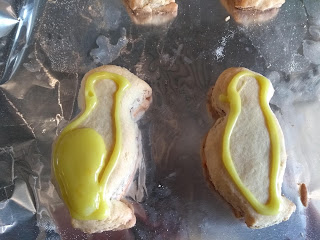


Wednesday, December 1, 2021

Linzer Torte

 Cooking Over the Holidays


Nicole here, back again in the kitchen, this time returning to our Cooking over the Holidays series within the Cooking with Colour food blog. This special feature highlights traditional, seasonal recipes cooked with family and dear friends. Our second collaboration for this special series features an Austrian Linzer Torte with special guests, Christine & Johannes. Unlike other postings on this food blog, this feature is our first online cooking lesson and collaboration! Our geographical locations for the duration of the lesson and recipe collaboration include Ottawa & Barrie, Ontario.

I cannot think of a better way to spend my holiday break than to learn about a new traditional recipe, cooking and baking in the company of special friends.

The smell of cinnamon and cloves with warm raspberry jam is an indulging combination that is all things magical! The dense richness of the almonds juxtaposes the sweetness of the crimson jam, making this winter treat both delectable and gluten free! 

Alcohol Pairing: Riesling or Late Harvest Gewurztraminer

Yields: 8-10 servings

What you Need:

¾ cup Arrowroot flour
¾ cup Sorghum flour
1 cup Almond flour
¾ cup refined sugar
1 package (8 g) of Vanilla Sugar (Dr. Oetker)
1 tsp. cinnamon
¼ tsp. ground cloves
1 egg
2 tsp. Cherry Brandy or Kirsch Liquor (optional)
1 cup butter, at room temperature
1¼ cup Raspberry jam
1 egg yolk beaten with 1-2 tsp. water

 *(If a gluten free torte is not desired, replace the arrowroot & sorghum flours with 11/2 cups all-purpose flour)

Brush
Cookie cutter(s)
Pastry Knife (optional)
Spatula
Tart pan

How to Make it Happen:

  1. Combine and whisk together the arrowroot, sorghum and almond flours with the refined sugar, vanilla sugar, cinnamon and cloves. Please Note: Arrowroot and sorghum is used here to lighten the density of the almond flour.   
    Christine preparing her utensils before our virtual cooking lesson!


    Whisk the flours, sugars, and spices together

  2. Beat the egg and liquor together and set aside. 
  3. Slice the butter into ½ slabs, then cut into small pieces and coat them in the almond-sorghum-arrowroot flours. You can also use a pastry knife to help knead the butter into the flour-sugar mixture.  Please Note: It is important that all the ingredients are at room temperature. A helpful tip from Christine, ensure the butter and sugars are thoroughly mixed and the sugar dissolves into the flours.
    Cut the butter into small pieces and coat them in the flours

  4. Next, create a well in the centre of the flour-sugar mixture, adding the egg and liquor in the centre. Gradually combine the dry ingredients into the wet ingredients until the dough clings together. QUICK TIP: Ensure that your hands are cold to help knead the dough until smooth.
    Add beaten egg and liquor to the centre of the flour-sugar mixture

  5. Separate and chill the dough in plastic wrap in the freezer for 1-3 hours or overnight.  
  6. After the dough has chilled, remove from the freezer and preheat the oven to 325 degrees. QUICK TIP: Gluten free flours thrive best when they are kneaded as little as possible. Do your best to avoid rolling and re-rolling your dough. If the dough becomes difficult to work with, chill the dough and start again. 
  7. Lightly grease an 11-inch (26-28 cm) springform pan with butter or vegetable oil.
  8. Prepare your work surface with a pastry mat and dust the surface with arrowroot flour. Take 2/3's of the dough and roll to ½-inch thickness on the floured surface. 
    Take 2/3's of the dough and roll to 1/2-inch thickness 

    Roll the dough into1/2-inch thickness, carefully place into the base of the pan


  9. Carefully lay the dough into the base and along the sides of the springform pan. If more dough is required, use the remaining 1/3 dough portion for additional pieces to patch the crust together.  Christine suggests measuring the dough to approximately 1 cm around the sides of the springform pan. 
  10.  Ensure to cut away the excess pastry dough using a sharp knife along the pie crust edge line. Now, spread the raspberry jam into the prepared dough using a spatula and set aside.
    The dough should measure approximately 1 cm around the sides of the pan


    Spread the jam into the prepared dough using a spatula

  11. Take the remaining dough portion and roll onto the prepared floured surface to ½- inch thickness. Here you can create stripes for a beautiful lattice finish or use holiday cookie cutter shapes to decorate the top of the jam filling. This will allow the dough to stand up to the sweetness of the jam. 
    Use stripes for lattice work or holiday cookie cutter shapes for the top

  12. Beat the remaining egg yolk-water mixture and coat the stripes or cookie cutter shapes before baking. Bake for 30-35 minutes in a 325-degree oven or until golden brown. Please note: Gluten-free flours do not require a long baking time. However, if you choose to use all-purpose flour, bake the torte for 1 hour at 350 degrees. Christine cautions all bakers to allow the cake to cool completely after baking, otherwise the torte will damage easily.


Friday, June 18, 2021

Watermelon-Cucumber Summer Salad


Nicole here again, getting a remote cooking demo in this week for my lovely colleagues to welcome the onset of summer with this simple salad stunner! Nothing says summer like the bright freshness of watermelon and the fragrance of basil. The peppery notes of the arugula contrast the crisp freshness of the watermelon, creating a lovely balance that is heightened by the saltiness of the feta cheese. 

A lovely meal on its own or featured with shrimp or chicken kabobs. 

This ensemble is a refreshing way to celebrate the first official day of summer! 

Alcohol Pairing: 

Wine: Ontario Rose (Sandbanks) for something sweeter try a Pink Moscato (Banrock)          

Beer: Radler (Lost Craft Fresh Cucumber Mint) for something sweeter try a Stiegl (Raspberry Radler)

Yields: 4 servings

What you Need:

4 cups arugula 

6 cups watermelon, cubed (seedless if possible)

½ English cucumber, thinly sliced

3/4 cup feta cheese, crumbled

10-12 basil leaves

½ cup olive oil

3 tbsp. white balsamic vinegar

1 tsp. dijon mustard (with/without seeds)

1 tbsp. honey

¼ tsp. salt

2 tsp. poppy seeds


How to Make it Happen:

  1. Begin by preparing the poppy seed vinaigrette by combining the olive oil, white balsamic vinegar, dijon mustard and honey. Use a whisk to blend the ingredients together. Add the salt and poppy seeds into the vinaigrette dressing. 
     Whisk the olive oil, honey, dijon mustard & vinegar together 

  2. Set aside the salad dressing to assemble the salad, starting with the first layer of arugula.
    Start with the first layer of arugula

  3. Next, add the sliced cucumbers and cubed watermelon to the arugula, sprinkling the crumbled feta cheese over top of all ingredients. 
    Next, add the cucumber 

    Add the watermelon over the cucumber & arugula

  4. Stack the fresh basil leaves together and roll them up tightly, slicing the basil into thin vertical ribbons.

    Stack the fresh basil leaves together and roll them up tightly

    Slice the basil into thin, vertical ribbons

    5. Drizzle the poppy seed vinaigrette onto the arugula, cucumber, watermelon and feta cheese salad. Sprinkle with sliced basil ribbons. 
    Drizzle poppy seed vinaigrette and basil ribbons onto the salad

*Recipe adapted from the Modern Proper website:https://themodernproper.com/watermelon-cucumber-salad*

Wednesday, March 17, 2021

Paddy's Lamb Tourtiere


 Nicole here, back again in the kitchen and wishing you all a ‘Happy St. Patrick’s Day!

This celebration marks the year anniversary of working remotely from home since the start of our lockdown in March 2020. Looking back on the year that was, it is truly quite amazing to see how creative and resilient we have become as a community, connecting in ways that bring us together, reinvesting in ourselves, learning a new skill or hobby and reflecting on things we hold dear. Let's raise a glass of Irish whiskey/coffee as we look forward to the day when we can celebrate once again in the company of friends and loved ones. Sláinte.

To celebrate our resiliency as we near our year-long anniversary, I am making Paddy’s Lamb Tourtiere’s. This recipe is a different spin on the traditional French Canadian Tourtiere which is typically made over the holiday season (Canadian Tourtiere). This version is used with ground lamb and veal with complementary spices. Once cooked, the crust is light and flaky and stands up to the density and richness of the meat filling. Pair this meal with an Irish Cream ale or a glass of Cabernet Sauvignon and you will wonder why you only indulge in tourtiere once a year!

Please note, this recipe is not gluten free and is made in batches to individually freeze and bake in the company of good friends and loved ones. 

Alcohol Pairing:

Beer: Kilkenny Irish Ale

Wine: Cabernet Sauvignon VQA Lakefront Konzelmann

Yields: 3 double crust 9-inch pies, each pie serves 6 servings


What you Need:

1.5 lbs. each of ground lamb and veal (you can substitute ground pork for veal)

1 cup onion, chopped

1 cup water

¾ tsp. white pepper

3 tsp. salt

¾ tsp. fennel (dried)

¾ tsp. rosemary (fresh or dried)

¾ tsp. celery salt

3-5 medium potatoes, boiled and mashed

Egg white for brushing prior to baking

Pie Crust

5 1/2 cups of all-purpose flour

2 tsp. salt

1 lb. lard

1 tbsp. white vinegar

1 egg

Enough cold water to make up 1cup of total liquid measure

Tools

Pastry knife

Distilled water

Brush

Cookie Cutters- Clover

3 double crust, 9-inch pie shells

**I make the pastry dough ahead of time and pre-freeze to help break up the work for pie assembly** 

How to Make it Happen:

  1. Place the ground lamb and veal, chopped onion and water in a saucepan or Dutch oven and simmer the ingredients together on medium-low heat, stirring occasionally until the meat is cooked thoroughly through and the onions are translucent. 
  2.  Combine and add all of the seasonings including the white pepper, salt, fennel, rosemary, and celery salt and continue to cook on low heat. 
    Add spices to the lamb-veal mixture and continue to cook on low-medium heat.

  3.  Wash, peel and chop the potatoes in quarters and rinse in cold water to release the starch. Boil potatoes until tender and drain from the water.
  4. Mash the potatoes without seasoning or liquid and set aside for later use. 
  5. Next, remove the saucepan of ground meat from the heat and thoroughly drain in a colander, allowing the  liquid to drain from the meat. This will eliminate any excess liquid from the pies. 
  6. Replace the meat back into the saucepan or Dutch oven and slowly integrate the mashed potatoes into the lamb-veal mixture. QUICK TIP: Do not skip this step as the integration of potatoes ensures the meat is moist and does not dry out once the pie is baked from frozen. You will know when the ingredients are combined sufficiently when the texture has thickened to a wet consistency. 
    Slowly add the mashed potatoes until the texture has thickened.

  7. Set aside the pie filling and start your work on the pastry dough by whisking the flour and salt together. 
  8. Slice the lard into ½ inch slabs, then cut into small cubes, gently coating them in the flour. 
    Cut the lard into cubes and gently coat the pieces in the four.

  9. Use a pastry knife to combine the lard with the flour for a crumbly texture and create a well (hole) in the center of the flour mixture. 
  10. Combine an egg with white vinegar and in a measuring cup, add enough cold water to make up 1 cup of total liquid measure. Beat liquid with a fork and add the liquid into the center of the well, gradually combining the dry ingredients into the wet ingredients until the dough clings together. 
  11. Separate the pastry dough into 6 equal ball portions. Two ball portions will yield one pie. QUICK TIP: When I make pies on my own, I break up the work by pre-freezing the dough to help with pie assembly. This is especially true if I do not have my Tourtiere Master teacher with me, Mr. Sean O’Malley. 
  12. Generously flour your working surface and rolling pin and roll each ball into a ½ inch disk. 
  13. Next, carefully line a pie shell with the rolled-out pastry dough, leaving the excess dough intact.


    Fill the pie shell with the meat filling until just below the pie's seal edge line. 

  14. Fill the pie shell with the lamb-veal meat filling until just below the pie's seal edge line. 
  15. Roll out the second pastry dough ball to complete the top of the pie. Before placing the pie crust on top, brush distilled water along the bottom edge of the meat-filled pie crust. This will help the crusts successfully adhere together. QUICK TIP: Roll the flattened pastry disk around the rolling pin and carefully roll the pastry onto the top of the pie to complete the tourtiere. 

    Carefully roll the pastry dough onto the top of the pie to complete the tourtiere.


  16. Cut away the excess dough along the pie crust edge line. Crimp the pastry crusts together with a fork, dipping the fork in distilled water every few crimps to ensure consistency along the edge of the pie. 
  17. Use the excess dough to decorate the pie with cookie cutter shapes. In honour of St. Patrick’s Day on March 17, I have used a shamrock cookie cutter, but any desired shape will do. Ensure to brush distilled water on the reverse side of the cookie shape before adhering it to the pie's surface. 
    Cut away the excess dough along the pie crust edge line and crimp the pastry crusts together with a fork.

  18. Use a butter knife to vent the pie. This can be achieved by making several piercings into the top of the pie crust. This will allow the steam to escape while the pie bakes.
  19. Repeat steps #12-18 to complete the two remaining pies. 
    Make several piercings into the top of the pie's crust.

  20. Individually place each pie into a large plastic zip-lock bag and set into the freezer. Baking Instructions: Bake from frozen into a 400-degree oven. Brush the pie with a beaten egg white and bake for 1 hour and 10 minutes.


Friday, February 12, 2021

Seafood Risotto (Ross bil-frott tal bahar)


Wishing everyone a Happy Valentine's Day! 

Nicole here again, celebrating the milestone of my 50th blog posting for the 'Cooking with Colour Food Blog'. It has been nine years to the date since I first started blogging about my serious passion for food  And how better to celebrate this entry then by preparing a rich and savory dish to celebrate over the weekend for Family Day!  

This seafood risotto is wonderfully rich, creamy and dense. Adding lobster truly enhances the richness of this dish as the garlic, seafood and butter sing together in harmony. Each bite lingers blissfully on the palate, which is why it is important to complement this dish with a high acidic wine to balance its richness. A fine dish to make to let your loved ones know just how much you care for them, and while I would suggest a Canadian Riesling, you can alternatively make it festive and stick to bubbles!

While my siblings and I grew up in a bustling and busy kitchen, we were always cautioned with the age old rule, 'To never add cheese to fish.'  I can just hear the words of my father, 'Not even a light dustin.' ' And while my father held his cooking rules close to his heart, I implore my own rules based on taste and richness. While you can certainly omit the cheese in this recipe, I find its integration adds a sharpness to the dish without overpowering the seafood. The cheese also brings a lovely creaminess to this dish which I love and enjoy.

Wishing you and your families a lovely, Family Day long-weekend!

Alcohol Pairing: Canadian Riesling or Italian Prosecco

Yields: 4-6 servings


What you Need:

1½ cup Arborio rice 

1 cup prosecco or dry white wine

1 cup shallots, finely chopped

3-4 tbsp. extra virgin olive oil

6 cloves of garlic, finely chopped (divided)

4-5 cups of vegetable or fish stock

1½ cup shrimp (fresh or frozen, shell removed)

1½ cup mussels (fresh, steamed & shell removed or frozen)

½ cup of Parmesan & Cortonese cheeses, grated

½ cup of butter (divided)

Chopped parsley for fish & final dressing 

White pepper

Optional Ingredients*

*Meat from two lobster tails


How to make it Happen:
  1. Prepare your vegetable or fish stock for the risotto. I resort to a 1½ bouillon cubes dissolved into 4-5 cups of boiling water. 
  2. Rinse and deshell the fresh/defrosted shrimp in a colander. Here I have also used frozen mussels with their shells removed to streamline the process, however fresh mussels would be most excellent. Add the shellfish to a medium saucepan with half the portion of chopped garlic, half the portion of butter, drizzle of olive oil, chopped parsley and a quarter measurement of the prosecco. Set aside the rest of the prosecco for the rice.
  3. Sautee the shellfish on medium-low heat for 6-8 minutes or until the shrimp is pink and the mussels plump and bright orange in colour. Continue to step 5.
    Sautee shellfish with garlic, butter, olive oil, parsley & prosecco

    Sautee on medium-low heat until the shrimp is pink & the mussels plump

  4. OPTIONAL STEP (Adding Lobster): Bring a pot of salted water to a boil. Before adding the lobster tails, reduce the heat slightly and cook until the lobster turns bright red (approximately 1 minute/ounce). Allow the lobster to cool in a colander. Once cooled, hold each tail up with the underside facing towards you. Make an incision down the interior middle of each tail, lengthwise. QUICK TIP: Use a pair of kitchen shears to help assist this process. Use your hands to help crack the succulent meat away from the shell. Once the meat is removed, cut into bite-size pieces.
    Cook the lobster in gently boiling, salted water until the shell turns bright red 

    Make an incision down the interior middle of each tail, lengthwise with kitchen shears
      
    Use your hands to help crack the succulent meat away from the shell

  5. Next, combine the shallots and the divided portion of garlic together in a large saucepan or Dutch oven. Sauté on medium heat until the shallots become translucent. PLEASE NOTE: I enjoy the sweet and sharp flavour shallots bring to this dish; however, you can easily substitute onions for shallots. Just ensure to add equal parts of onion to the recipe. 
  6. Add the Arborio rice to the sautéed shallots and garlic, coating the rice by stirring constantly for several minutes. Once the rice is coated, add the prosecco and continue to sauté for another 4-7 minutes to allow the rice to absorb the liquid.
    Add the prosecco and allow the rice to absorb the liquid

  7. Remove the shrimp and mussels from the heat and allow to cool. 
  8. Place the prepared stock close to your prosecco flavoured rice and gradually ladle 1-2 spoonsful of stock into the rice mixture and stir until the liquid is absorbed. Continue to ladle the stock into the risotto until the liquid is absorbed, stirring the mixture constantly. QUICK TIP: You do not want to RUSH or CHOKE this process. This takes time so be prepared! This is the most important step in creating rich and creamy risotto! Ensure to continue to add the stock slowly to allow the rice to absorb the liquid in small quantities. As the stock is added the rice becomes thick and creamy. 
  9. Once all the stock is absorbed, add the shrimp, mussels and remaining juices' from the fish into the risotto and combine slowly.
    Add the shrimp, mussels and remaining juices' into the risotto and combine slowly

  10. Next, the optional step of adding lobster to the risotto. Ensure to add the lobster, remaining butter and grated cheeses to the risotto. Continue to cook on medium-low heat for another 4-7 minutes or until the risotto is dense and creamy. Plate with a sprig of parsley and white cracked pepper.
    Add the lobster, remaining butter and grated cheese to the risotto
     
    Continue to cook on low heat until dense and creamy

    Plate with a sprig of parsley and white cracked pepper